Author Archives: wpadmin

Thames Clipper

A few pictures from a round trip on one of the Thames Clipper ferry services. This was an exceptionally warm afternoon in May 2012 a week before the rainy Diamond Jubilee celebrations on the same river! The Thames Clipper service is a nice way to travel along the river from Westminster end, out as far as Woolwich arsenal. For the stretches after Tower Bridge, the speed is de-restricted and these powerful boats really rip along the water – there is an amazing deceleration as the engines are cut on approach to each pier.

Well worth a trip on one – work one into your schedule for a day’s sightseeing – or even buy two tickets for the round trip and stay on the boat the whole time, admiring the views.


Here are some videos to show the speed of the Clipper when not under speed restriction:

Clipper (1)

Clipper (2)

Clipper (3)

More TV … brace yourselves

As part of a new BBC4 series on Measurement, a film crew has been working at NPL, filming various items for the three hour-long episodes. The presenter of the series is Marcus du Sautoy, and he and the film crew spend some time with me in the dimensional metrology laboratories, filming some interviews and some interesting items of equipment.

Marcus du Sautoy and me, with Nanosurf 4

Marcus inspects Nanosurf 4

The series aired on BBC4 in early summer 2013 as the 3 part series ‘Precision: the measure of all things’.

Fortunately for the viewing public, my scenes were left on the cutting room floor 🙂 Apparently they filmed far too much to be included and had to perform severe edits to fit the running time.

You lucky people…!

Arduino temperature web server

I have been playing around at building something using the Arduino system. (I have tried to mix the supplier links on this page, though for reference, all items so far have been supplied by Proto-Pic UK).

At work, we have a temperature logger that plugs into the network. It stores temperature and humidity data onto an SD card and displays it on an LCD screen. When the temperature is too hot or cold, it emails people to warn them. It has a webserver which shows latest temperature and humidity and allows simple graphs to be plotted. Unfortunately, the resolution of the temperature data is only 0.1 °C. Whilst this may be OK for most applications, the logger is installed in one of our temperature-controlled laboratories which is controlled to 20.0 ±0.1 °C, i.e. min-max range is double the logger’s resolution!

I wanted something with better resolution, and ideally cheaper, so I set about building something using the Open Source Arduino system.


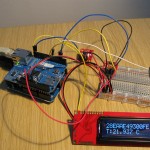
Arduino temperature sensor and server - click to enlarge picture

So far, I have been building the system using an Arduino Uno R3 unit, into which I have plugged the latest version of the Ethernet Shield. This add-on board contains a serial to ethernet interface as well as a micro SD card holder. The Arduino Uno is connected to the PC using a USB lead and programs are uploaded to the Uno via this USB lead which can also power the device. When not connected to the USB, there is a power socket which can be used with either a battery adapter or mains adapter. So, in this simple two-board system I have:

  • data storage on micro SD card
  • network interface
  • programming ability

To enable proper real-time logging, which is tolerant of power outages, I have added a DS1307 Real Time Clock module, which retains time using a small battery when the power supply is disconnected. This RTC module uses an I2C interface which basically requires 5 V, 0 V and two signal wires.

At the moment, I am testing two types of good accuracy temperature sensors: the SHT15 unit from Sensirion (also includes humidity sensor), mounted on a SparkFun board and several DS18B20 OneWire devices.

Local display is made available via a backlit LCD screen. To cut down on the number of Arduino pins used, I have opted not for the usual Hitachi driver model, but one using a serial interface, from SparkFun. The LCD characters to display, as well as control codes, are sent along a 1 wire software serial connection, so I only use up one extra pin, as well as the common power supplies (0 V, 3.3 V).

The DS18B20 OneWire devices are really neat. They need only one wire for data and power (plus GND) – called parasitic power mode, where they power themselves for a short time each time the data line goes high (using a capacitor). They can also accept a supply voltage on a third pin, if necessary. Several devices can be connected to the same interface, i.e. with just a GND wire and a DATA wire, you can connect several of these to an Arduino, using only 2 pins – DATA and GND. Each device has an in-built hard coded serial number, and they can be individually addressable. Data resolution is 12 bit, or can be reduced if required.

I have got a small web server running on the board which will display latest data from one of the sensors – soon all of them. The LCD screen cycles between displaying temperature and humdity from the SHT15 device, the IP address and RTC time and the serial numbers and temperatures from the DS18B20 sensors.

Next stages:

  • Output all current data to the served web page
  • Log data to the micro SD card slot
  • Feed the logged data into a chart on the web server page (possibly using Google Chart Tools, or Pachube)
  • Implement email alerts
  • Compact the code size (probably need to do this sooner rather than later !)

Here is a video of the LCD screen cycling through the various displays: logger video (7 MB – right click and download if your browser does not play it).

I never learn

Well, after a previous post where I mentioned I had to adjust various settings after deciding on a new Theme, and telling myself not to make large updates/uploads until the theme is settled… I went and did it again!

I found a shiny new theme, installed it and activated it and now some of the old bits no longer work and probably never will work in the same way again, so at least one of my mega image uploading sessions has been turned useless – doh !

At least the theme is nice and shiny.

Now for a few tweaks…

tsohost.co.uk

As I mentioned in the previous post, I have recently moved jartweb.net from a previous host, to its new location here at tsohost.co.uk . I moved because I wanted to experiment with some additional web technologies and I found that my options (at reasonable price) on the old host were very limited – no MySQL databases!! Pah!

I had a quick scout around online and then glanced at the back pages of PcPro magazine (the only IT mag I subscribe to now that PCWorld has gone the way of the 8-bit console) and I saw an add for tsohosts. The initial ‘TSO’ rung a bell back from my old University days when I used to have an account on Cambridge’s Phoenix mainframe (a box from IBM) and TSO stood for Time Sharing Operation. There were lots of commands starting with ‘TSO’ which could be used to make the machine dance, so I thought I’d have a quick glance around at this hosting company. What I found were some really good positive reviews and a pricing structure which looked attractive for the hobbyist ideas I had brewing. A fast response to my initial email had me reaching for my credit card.

I signed up and began the FTP download of the site from the old host and the upload to the new host. Apart from a few absolute links (tsk tsk), the site came alive almost immediately with no problems. I submitted a DNS change on the old host and slowly,overnight, the internet updated its servers to point to the new location. By midday the next day, the site had, to all intents and purposed, been moved. There was a minor hiccup in the evening when some DNS servers were a bit confused for a while and my email client kept trying to open the old address but with the new server’s password, but this resolved itself by the next day.

Adding this blog was simplicity itself – a couple of clicks in the cPanel, and there it was! Another couple of clicks and it had its own sub-domain. The only ‘gotcha’ was that I realised, after uploading and cropping tens of images for the header, that when I switched themes, the old header images were not directly compatible (wrong size) and the database that held their information had them registered in the old theme. I had to download them all, re-size in Photoshop, re-upload then edit the database (using phpMyAdmin) to set them to be in the new theme’s database. And voila! New theme, old images, working OK. Lesson to learn – experiment with small amounts first before committing to a theme and uploading tons of data to a theme specific database. But, that’s what this blog is all about for now – learning something new.